Enter Transactions
Help Home | System Home | Core | Errors |
The Enter Transactions program is used to enter transactions such as disbursements and receipts. You must build your General Ledger master file before you can enter any transactions.
This program can be run as many times as may be required during the month. If the company you are working with only has a small volume of transactions, you will probably find it more efficient to process all transactions at one time at month end. If the volume of transactions is very large, you may find it convenient to enter transactions as often as once a week.
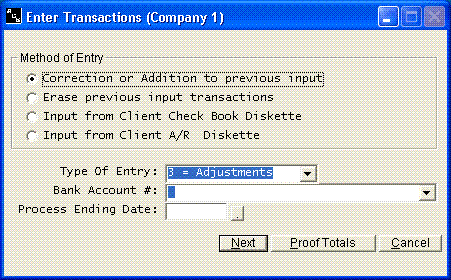
Method of entry
As you enter your transactions, your entries are stored in a temporary work file. Each time when you finish entering transactions into the system you will receive proof totals, such as the total debits and credits entered. Often you may make errors in input which are not easily identified, or you may find that you need additional information before you can continue. If there are un-posted entries in the work file, the first option above will allow you to return without losing your original entries You should the option to erase previous entries if you wish to loose them and start a new batch..
It is not intended that you use this corrections option throughout the month to allow the entry of all transactions before you post your entries. If other systems, such as the payroll system, are integrated into this system, those systems will clear this work file each time they post transactions to the General Ledger. This will lose your input. Another potential problem is that sooner or later you will forget to take the right option and destroy your previous input before it is ever posted.
Type of Entry
You have options for disbursements, receipts, adjustments, payroll checks, sales, or purchases.
This input program has been designed so you are only required to enter one side of all entries, except adjustments. The system automatically accumulates the other side of your entry. For example, if you are entering disbursements on a particular bank account, you will only enter the debits to the various expense accounts. The system will accumulate the credit to cash in bank and automatically generate the entry during the posting process.
Bank Account
Enter the bank account number of the bank to which the transactions should be debited or credited. If you are recording sales or purchases, enter the receivable or payable account number.
Process Ending Date
The date requested above will be used on the summary bank entries. It will normally be the last day of the month.
Following is a brief description of each type of transaction.
Disbursements
You will use the disbursements option to enter checks. Normally your contra account for disbursements will be the cash in bank account. You will enter disbursements as positive amounts unless you want the account credited.
Receipts
You will use the receipts option to record cash received. This contra account will normally be the cash in bank account. Please note that even though the system has been written to identify credits by a minus sign, you do not enter receipts as negative figures. It is much easier and faster to enter positive amounts, so the system has been written to enter receipts as positive figures and the system will immediately turn the sign around. After the initial entry, the receipts will show the minus sign. If you ever make corrections to the receipt entries, you must enter the minus sign at that time. If necessary, you can cause the system to generate a debit entry by entering the initial receipt as a minus figure.
Adjustments
When entering adjustments you will enter debits as positive figures and credits as negative figures. The contra account (bank account) will be unaffected by any adjustments, so you need not worry about your contra account when entering adjustments.
Sales
You can enter your sales tickets directly into the General Ledger. Any items entered through this option will appear on the sales journal.
The contra account for sales entries will normally be your accounts receivable account. Just as with receipts, the system has been designed to allow you to enter the sales as positive amounts and the system will then turn the sign around for you. You will need to be careful to use the minus sign any time you make corrections.
Purchases
The system will allow you to enter your purchases through this option and get a separate purchases journal. Your contra account will normally be your accounts payable account.
Change Contra Account Numbers
As explained earlier in this section, the system will accumulate one side of your entries, except for adjustments, and generate a "contra entry". The system can generate both credit & debit entries for the same contra account, but it can only accumulate entries for one contra account at a time. If you have more than one bank account or if you change from receipts and disbursements to sales or purchases, you will have to change contra accounts. You can reassign the same contra account several different times during the same run, but you can only use 10 different contra accounts in the same run.
Correct G/L Entries
You can correct entries at any time, but normally you will want to wait until all transactions have been entered and make all corrections at one time. The correction process will request the record number of the transaction that needs to be corrected. This number must be obtained from your edit list or from a listing on the screen. If you work from the edit list, it will save time to make all corrections at one time at the end of the entry process.
Please note that this correction process can only be used to correct entries in this temporary input work file. Once the entries have been posted, it is to late to use the correction routine. At that point you must file maintenance the General Ledger file or enter an adjusting entry to make your corrections.
Disbursements
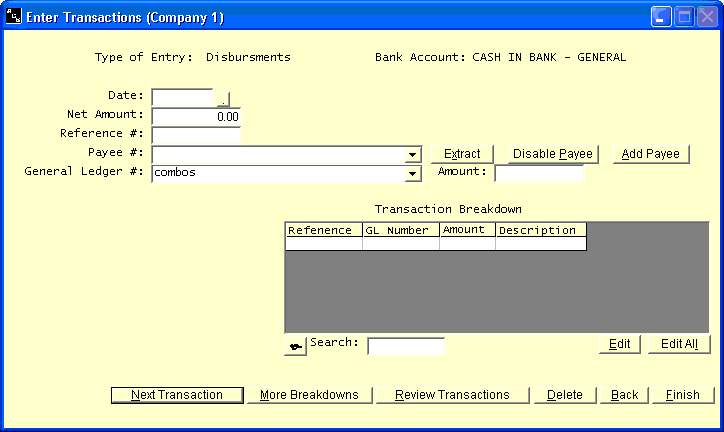
The following information is requested on each disbursement.
Date
The date should be entered in the format MMDDYY. The date will be retained from screen to screen, and it will only be necessary to re-key the date as it changes.
Net Amount
Enter the net amount of the transaction. Remember that even though the system uses the minus sign to distinguish credits, you will only need to use negative figures on the adjustments. The system will automatically reverse the sign in this program based on the type of transaction you are entering. You can enter the amount as 0 and the Payee/Description as VOID to record a voided transaction.
Reference Number
The reference number can be 12 characters long. If you use only numeric characters, the system will automatically increment your reference number after each transaction. The system uses the reference number to tie multiple entries back to the same transaction. You must use a unique reference number on each transaction. Of course, you will use the same reference number on a transaction with multiple breakdowns.
Payee Number
If you process several entries to the same payee, we highly recommend you set up a Payee Record for that vendor. That record will contain the payee name, the standard general ledger numbers where the purchase is normally classified. When assigning payee numbers, we recommend you just use the first few characters of the name. This will allow you to easily find the record without having to search for it.
Once a payee record has been established, all you have to do is enter the payee number, press the Extract button or Press ALT X and the system will extract the payee description, the general ledger numbers, and breakdown descriptions for you. If the breakdowns are correct, all you have to do is press enter and start the next transaction. The system will automatically update the vendor record for each purchase. 1099 information will be available..
If you have an entry that needs to be classified to more than one account, enter the amount of the first allocation under the Amount field. Click the More Breakdowns option to add additional breakdowns. On entries with only one allocation, it is not necessary to enter an amount in the Amount field. The system will assume the same amount as the Net Amount you entered earlier and save you from entering the same amount twice.
Payee/Description
If you are not using the Payee features of the system, you can disable the Payee features and enter the Payee Name or Description.
General Ledger Number
Enter the general ledger number to which this portion of the transactions should be allocated.
Amount
The Amount field is only used when you have multiple breakdowns on a transaction. This amount field is the allocated amount amount that should be classified to the general ledger number you have just entered. With only one allocation, it is not necessary to answer the amount field..
Description of Buttons
Extract
The extract button is used to pull information from a payee record. Once the payee number as been entered, you can click the Extract button or Press Alt X and the system will access the payee record and extract the information for the remainder of your entry.
Disable Payee
If you do not with to use the payee features of the system, you can disable it by clicking the disable button. To enable it, just click it again.
Add Payee
You can add payees as you enter transactions. Simply click the add payee button and enter the vital payee information. You will be returned to the transaction entry screen.
Next Transaction
When you are completed with a transaction, press the Next Transaction button. Please note that any button that is highlighted is the default button when Enter is pressed. Actually when you are through with a transaction, you can press Enter and never have to reach for the mouse.
More Breakdowns
If a transaction is being allocated to more than one general ledger account, click on More Breakdowns instead of Next Transaction to allow for an additional breakdown.
Review Transactions
The Review Transactions option will allow you to review the transactions you have just entered. You can review and make corrections at any time. See more details later.
Delete
The Delete option will allow you to delete the transaction that is displayed on the screen at the time.
Back
The Back button will allow you to return to the first screen. This will allow you to change bank accounts or transaction types.
Finish
The Finish button will allow you to move to a proof total screen when completed. At that point you can check the proof totals and make a decision to make corrections or to post the transactions to the general ledger.
Corrections Screen
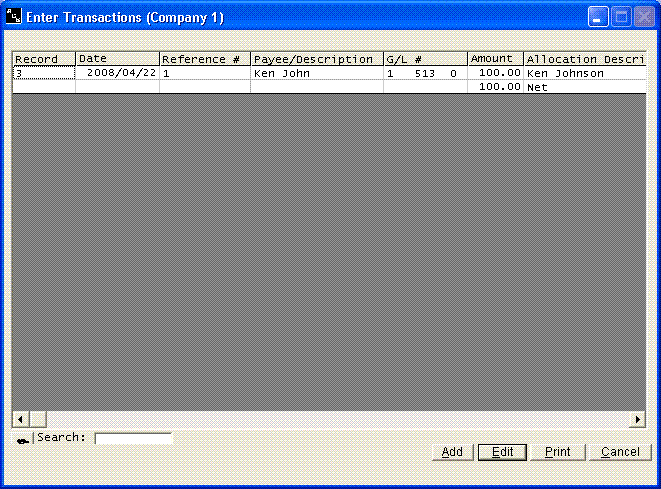
When you take review transactions, you will get a list of all transactions entered during this batch. You can highlight any transaction and click Edit to make any changes. You can Print the listing by clicking Print. If you want to Add more transactions, click Add.
The Search option at the bottom of the screen will allow you to search for any piece of information in the list of transactions.
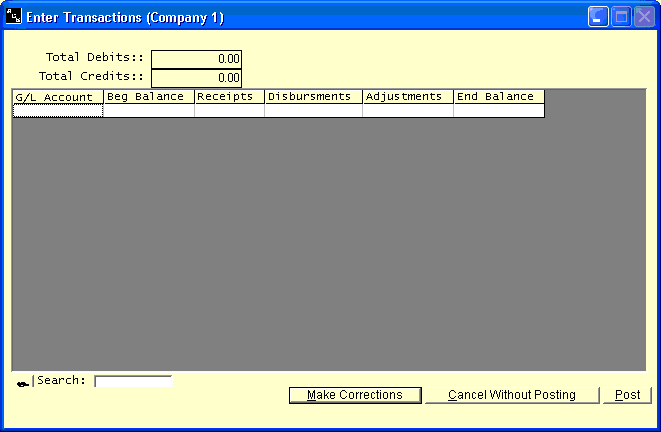
Each contra account (bank account) that you used will be listed on the proof total screen. The total of all transactions processed against the account will be shown, along with the beginning and ending balances. You should be able to compare the ending balances to your bank reconciliation and check the accuracy of your input.
You will also receive a total of the debits and credits processed. The debits and credits should agree, unless you have intentionally processed "One Sided" adjustments to get your books back in balance.
If the proof totals are correct you can continue on to the posting process. If you have errors or simply want an edit list of your input, you can indicate that corrections need to be made.
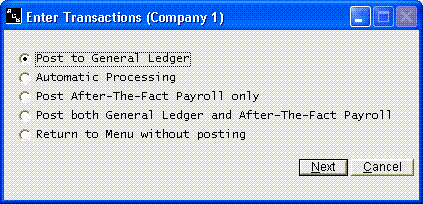
Once your proof totals are correct and you have indicated you are ready to continue, you will be given these options. The instructions for automatic processing are found in another section of the manual.. If you select automatic processing, the computer can handle processing for you.
If you cannot get the proof totals corrected or if you need more information before you are ready to post the transactions, you can select to return to the system menu without posting. You can re-select the input process at a later time and indicate on the first screen that you are making corrections. This will allow you to return to this program without losing your input.
The last option will immediately post your entries to the General Ledger accounts.
Please note that your input is only contained in a temporary work file. You must choose to post the transactions to the General Ledger in order to have General Ledger updated for the new transactions. You can either include the posting routine as part of automatic processing, take option 2 above to post the General Ledger immediately, or return to the menu and post the entries using Post General Ledger from the Current Period Processing Menu. If you fail to have the system post your entries, these entries will never be reflected in your General Ledger account balances.
Or check out our special User's Only site at: planetacs.net/user
