Financial Statement File Design
Help Home | System Home | Core | Errors |
Building and Maintaining Financial Statement File
This system has been designed to give you the flexibility of designing your own financial statement format. This section will give details as to how to build these files.
The Balance Sheet, the Income Statement and the Funds Statement/Cash Flow Statement are all produced from these financial statement files. You can have two different formats for each of these statements, so you can actually have six different format files if you are using all of the features available. Following is a list of the file as they will be referred to in the programs. Please note that you can use the Fund Statement/Cash Flow Statement as a fund statement or a cash flow statement, but not both. For example, if you need a cash flow statement, you will design such a statement and then select the appropriate print routines from the Print Financial Statement menu. If you need both statements from the system you can design the primary statement as one type of statement and the secondary statement as the other type.
When installing the system, you must understand the concept upon which the system is based. There is one major file in the system that holds all of the General Ledger accounts for each company. There are six other files that hold the financial statement formats shown above. Each General Ledger account contains six slots to hold the reference numbers as to where that General Ledger account will appear on each of the six statements.
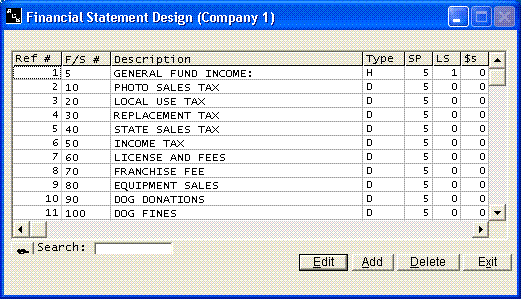
Once you select the statement you wish to work with, you will get a grid of the entire file. You can make corrections by double clicking on any item or by highlighting the item and clicking Edit.
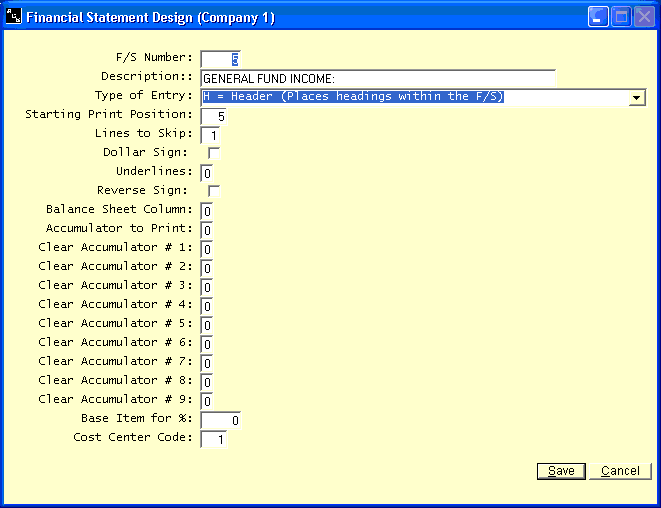
Each of the six format files is designed the same way and contains the same type of information. Following is a list of each piece of information that will be contained in each format record.
Reference Number
In order to access and identify the format records, each record must have a reference number. The reference number must be all numeric and can not exceed four digits. It is suggested that you assign your numbers in increments of ten and begin with number ten. This will give you room to expand the files for any item you may wish to add later.
Description
You will enter the description exactly as you wish for it to be printed on your statements. It is limited to 50 characters, but you should attempt to keep the description as short as possible. If there is not enough room to print the full description on the statement, the system will automatically shorten the description. It is impossible to give you the exact size to use, since the size of the print field will vary with the starting positions you enter and the columns you choose for printing.
Type of Entry
Each record that you place in the format file must contain the type of entry. Only the types listed below are acceptable codes. You must be aware that you will control everything that is printed on your statements, except the company name and the date.
R = Report Heading - You have the ability to enter your own report heading. If you do not enter a report heading, the system will use the standard name of Balance Sheet, Statement of Income and Expenses, and Statement of Changes in Financial position or Cash Flow Statement.
The record for the report heading should be the first record you enter so that the heading is known when the statements first begin to print.
If either the report heading or secondary heading needs to be changed during the running of the report, the new R and S records must be assigned before you indicate to the system to space to a new page. If this is not done, the page heading routine will still print the old page heading on the first page of the new section of the report.
S = Secondary Heading - The secondary heading is not required, but it will allow you to place department names, etc. in the heading. A sample heading might look similar to the following:
Advanced Computer Service, Inc. (Pulled from file)
Statement of Income and Expenses (Code R)
Sales Department (Code S)
For the *seven month period ended* July 31, 1995
* (Pulled from period ending date file)
F = Footnote - The system will allow you to print a message two lines from the bottom of each page of your statement. Normally the message would read "See Accountant's Compilation Report", but you can enter any message you choose. The description on each format record can only be 50 characters long, so the system has been designed to allow you to enter two footnote records in order to expand your message to one full line. If you do enter two footnote records, you must tell the starting position of the first record and the second record will then be automatically continued on.
The footnote records should also be entered close to the front of your format files so that the system will know the footnote information before it spaces to the first new page.
H = Header Record - The header records are any descriptions that are to be printed, but contain no amounts. The wording "ASSETS" across the top of your balance sheet or the wording "Current ASSETS" at the beginning of your asset section are examples of header records.
D = Detail Record - The detail records are the records used to accumulate the information from the General Ledger master file. These will show amounts when printed. "Cash in Bank" would be an example of a detail record. If you had several cash accounts in your General Ledger you would probably assign them all to be printed under the detail record called "Cash in Bank".
You can have as many detail records as you wish to have printed on your financial statements.
T = Total Record - Total records are any format records that will print totals of the detail records. "Total Current Assets" or "Total Assets" would be examples of total records.
P = Profit and Loss Record - The profit and loss record is a mandatory record for the "Fund Statement" format, and possibly a mandatory record for the "Balance Sheet". You must have either a "P" record or an "E" record in the balance sheet. For the "Balance Sheet" the system will accumulate the profit or loss as the "Balance Sheet" is printed. In order to allow the "Balance Sheet" to balance it needs a record specifically for use in printing the "Profit or Loss/Year-to-Date". Your profit and loss record will be assigned between your detail equity accounts and your total equity account. You can use any name you choose.
Use of the "P" record will allow the profit or loss for the current year to show as a separate line item on the balance sheet. If you want the current year's profit combined with the last equity account you can use an "E" record instead.
On the fund statement you will need one "P" record to show the net income. Your descriptions will normally be "Net Income" and the records can be placed anywhere in your fund statement. The "P" records cannot be used on the income statement format.
E = Equity Record - If you wish for the current year's profit or loss to be combined with your "Retained Earnings" account (equity) on the "Balance Sheet", you can use an "E" record instead of the "P" record as described earlier in this section. Your "E" record must be the last balance sheet item before your totals.
If you choose this method of presentation, your "E" record will be your actual retained earning account and it must contain the number of the accumulator to print just as the "P" record does. You can not have an "E" record and a "P" within the same "Balance Sheet", but you must have one or the other. In summary, if you use a "P" record to show the current year's profit on the "Balance Sheet", it will be a separate financial statement format record and will have a description such as "Profit or Loss/Year-to-Date". If you utilize the "E" record, you will simply code your "Retained Earnings" account as an "E" record and indicate some accumulator to print. Your "Retained Earnings" will then reflect both the beginning balance and the current year's profit.
B = Book Account - The "B" record is used only in the Cash Flow Statement. You will use the "B" record to denote both the beginning bank balance and the ending bank balance. You must indicate an accumulator to print on the ending bank balance. This is the only way the computer can distinguish between your beginning and the ending balance.
C = Cash Flow Record - The "C" record will only be used in the cash flow statement. Any time a "C" record is used the computer will stop and ask the month and year to date amounts as the cash flow statement is printing. This must be used in situations such as transfers from savings, where you must show the receipt of the cash, but the computer does not have the details.
Starting Print Position:
You will assign the starting print position of every record. For example, if you want a half-inch indention, you would enter 6 as the starting position.
You can use any indention you choose, but you should always keep in mind that the further you indent, the more you are limiting the print field for your description. You should probably never indent more than an inch except on your Header Records.
Lines to Skip After Print:
This is the number of blank lines that you wish to appear after the record you are working with has been printed. For example, if you are entering a header record called "Assets", you will probably want two or three blank lines between "Assets" and "Current Assets", so you would enter two or three as the lines to skip.
Any time you wish to skip to a new page you should enter 99 as the lines to skip. This is simply a code to the system to space to a new page. Any footnotes will automatically be printed when you space to a new page or when the financial statement programs terminate. You should not place a code 99 in the last record of your statement. This will waste 1 page of paper. The system will automatically go to the bottom of a page when the statement is complete.
Sign Printed
You have the ability to determine if and when dollar signs are to be printed. The codes to use are 1 for yes and 0 for no.
Underlines
You can place underlines any place in the financial statements. The codes are 0=No underlines and 1=One underline, 2=Double underline. A common place to use a code 2 would be in a total record called "Total Assets". The underlines will only appear in the column which contains the amount.
Reverse Sign
In this General Ledger system all credit balances are shown as negative amounts. For good financial statement presentation, negative amounts should not be shown unless they are indicating a balance opposite to normal. You will need to turn the sign around on all liability, equity, and income accounts. The codes are
0=Normal and 1=Turn the sign around.
You should not turn the sign around on the code "P" records in the balance sheet, but you will need to turn the sign around in your "P"' record on the fund statement.
You must reverse the sign on the ending bank balance on a cash flow statement.
Balance Sheet Column:
The balance sheet has three fixed columns. You must indicate in which column each balance sheet detail or total record is to be printed.
The columns are also fixed on the income statement, but the type of income statement that you select to print will determine the columns.
Number of Accumulator to Print:
The system provides for 9 accumulators. You will use them in indicating the amounts that are to be printed on your total records. All accumulators total at the same time. For example, if you have printed down to the third detail asset record and have not cleared any accumulators, all accumulators will be the same amount and they will be the total since the balance sheet began to print. If you need a total of the "Fixed Assets", you would need to clear one accumulator as you print your "Total Current Assets". That accumulator would then start adding again with your first fixed asset. You will use the accumulator in this fashion. Be sure to leave one accumulator uncleared so you will have the total profit or loss figure to be printed in your code "P" record or code "E" record. You must indicate an accumulator to print on any "T", "P", or "E" record. You must also indicate an accumulator to print on the ending bank balance on a cash flow statement.
Clear Accumulator 1 Through 9:
Each accumulator adds from the beginning of the statement until the time that you clear that accumulator. It then starts adding again from that point forward. Each time you need a total you will need to set an accumulator to zero immediately before you start printing the information you want totaled. You can clear the accumulator by entering 1 beside the accumulator to clear. You can clear several accumulators in the same record. You will probably find it easier to control if you will reuse the first, second or third accumulators for your totals of "Total Current Assets" and "Total Fixed Assets" etc. You will need to let one accumulator total and never be cleared for your "Net Profit or Loss". Nine in any of these fields will prevent accumulation on the record being printed. If you wish to exclude a detail record from a specific accumulator, you can place a "9" in that accumulator and the amount will not be added to that accumulator.
You can better understand the use of the accumulators by referring to the examples at the end of this section.
Base Item For Income Statement Percent:
The system will produce several different versions of the income statement showing percentages. You can select the item upon which the percentages will be based. It can either be a detail record or a total record. You should place a 1 in this slot to indicate the item to use. If you have more than one item to use as the base, such as on departmentalized statements, you will have to indicate when the base figure is to be cleared, as well as what item to use as your new base. For example, assume that you are using total income in each department as the base for your percentages.
At the end of each department you should enter 2 in this field to clear the old base figure so that your individual income accounts in the second department will not be based on the total income of your first department. Please note that a 1 in this field indicates the percentage base and a 2 in this field indicates the base is to be cleared.
Cost Center Code:
Most users of this system will not be concerned with this code. The system allows you to have more than one cost center. You can use this code to designate which format records belong to which cost centers. This gives you the ability to pull financial statements on individual cost centers or to pull statements on all centers contained in the file.
The next few pages contain samples of a partial balance sheet, a partial income statement, and a partial statement of change in financial position. You can review these samples to better understand how the system works.
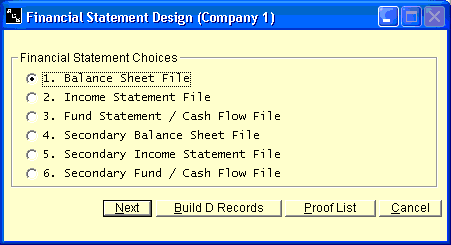
You will first select Financial Statement File Menu from the main General Ledger Menu to access the Financial Statement Format File menu. Following is a display of the sub-menu you will receive when you first select option 4. Each of these options is explained in detail in this section.
You will receive a warning that this initial file preparation program will clean the file which you have selected. The name of the file will be printed on this screen. If you selected this program in error or if you only need to add more records to the file, you can return to the menu without destroying the file.
Add New Records
The second option on the Financial Statement Format Menu will allow you to add new items to any existing financial statement. These files contain the information that will control the data that will print on the different financial statements.
You must always indicate which statement you wish to access.
The reference number field can contain five characters. The description is limited to 50 characters. The type of entry must contain one of the following characters.
R = Report Heading
S = Secondary Heading (department Name, etc.)
F = Footnote
H = Header Record (Example: Assets)
D = Detail Line
T = Total Line (Accumulated Detail Lines)
P = Mandatory And Only Valid on Balance Sheets and Fund Statements. This Record Should Have a Description Field Similar to "Profit/Loss-YTD" or "Net Income".
E = Combined equity and CURRENT Years Profit
B = Bank Account on a cash flow Statement
C = Cash flow record when Operator Input is Required
The "Starting Print Position" and "Lines to Skip After Print" can contain two numeric characters.
The following fields must contain either a 0 or a 1 (0 = No, l = Yes)
$ SIGN PRINTED
REVERSE SIGN
CLEAR ACCUMULATOR (1-9)
BASE ITEM FOR INC. STMT. %
The "Underline" field must contain a 0, 1, or 2, which will determine how many underlines are to be printed.
The "Balance Sheet Column" must contain a 1, 2, or 3, if you are working with one of the two balance sheet files.
The "Number of Accumulator to Print" field must contain a 0 through 9, depending on the accumulator that you want to print. Enter 0 if no accumulator should print.
The "Cost Center Code" can contain up to three numeric characters.
You can review the beginning of GL Master File for a more detail description of the items contained in each format record
Print Proof List
The Proof List option is at the bottom of the first screen. This listing will show all of the information that is contained in any of the financial statement format files. It can be run anytime. The proof list will normally be used in proofing your original input, but you may find it very helpful to always keep a current proof list in the company file. This will be of great assistance if you need to add or delete lines from the financial statements. It will also be helpful when you are assigning financial statement reference numbers to any new general ledger accounts.
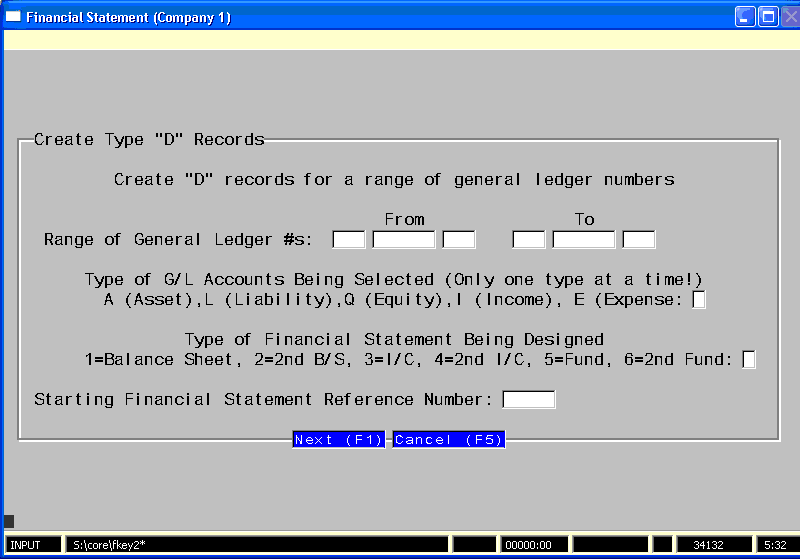
Create "D" Records
There is on option on the first screen that will allow you to build about 95% of the financial statement without having to enter the information yourself. This routine cannot build the Heading or Total Records, but it can build all of the D records. For example, if you were designing an income statement, the first few lines of the design would be the R record, maybe the S record, and one or two H records. The would come a series of D records for the income accounts. We suggest you increment your financial statement reference number by 10. If this was done, your next available reference number would be about 60.
To create the first set of D records, you would give it the first and last general ledger number of the revenue accounts. You would the indicate that they are revenue accounts. You would tell it you are designing the primary income statement and tell it to start with reference #60.
You would proceed in this manner. After the revenue accounts you will have some more "T" (total) and H (heading) records. Maybe taking up 2 or three reference numbers. Look at the grid and see what the last reference # it assigned to the revenue accounts. Add about 30 to that number and start creating the D records for the expense accounts. When finished creating the D records, you can come back and insert the header and total records.
Or check out our special User's Only site at: planetacs.net/user


