Bank Reconciliation
Help Home | System Home | Core | Errors |
The Bank Reconciliation option from your Check Book System Menu will allow you to reconcile your bank. The bank reconciliation feature works from your transaction history file, so make sure all of the checkbook transactions have been recorded. The only thing you need to do in order for the system to print your reconciliation is to code the checks and deposits that have cleared the bank. This is the first step you must perform.
We recommend you reconcile the bank before you transfer your information to the General Ledger system. Problems are more easily located and corrected before the information is transferred to the General Ledger system. The bank reconciliation menu looks similar to the following: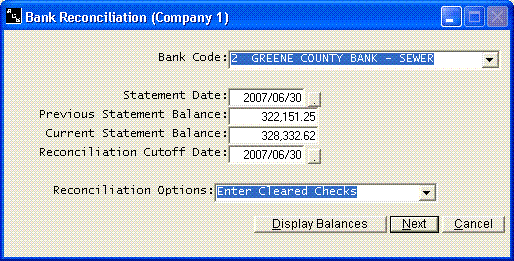
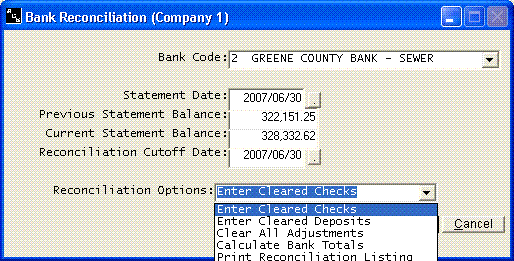
Enter Cleared Checks
The Enter
Cleared Checks option will be used to code the checks that have cleared the bank. .![]()
You have multiple options for clearing the checks. If your bank statement lists the cleared checks in numeric order and marks any skipped numbers with an *, etc., it is very easy to clear the checks using the Clear Range of Checks.
Clear Range of Checks
![]()
Clear From List
The Clear From List option will display a list and allow you to check the ones that have cleared You also have the option to select individual checks to clear.
![]()
To clear a check, simply click on the check to be cleared. To unclear a check, click on the check a second time. You should be a running total of the checks cleared. It should agree with total checks cleared on the bank statement.
You can click on Display Cleared to see just the cleared checks. You can click on Display Un-cleared to view the remaining un-cleared checks. If you choose to Clear By Range, it simply returns you to the options shown on the previous screen.
The Display at Top option always keeps the last cleared check at the top of the grid. It is much easier to find a check when you don't have to scroll up and down to look for it.
Once all checks have
been cleared, choose Cancel to return to the main reconciliation menu.
Enter Cleared Deposits
Option 2 will allow you to enter cleared deposits. You must enter all cleared deposits before you can print your bank reconciliation.
![]()
Clear By Dates
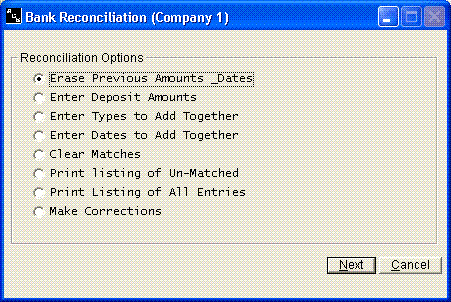
If you clear by amount, you would first Erase Previous Amounts. You would then Enter Deposit Amounts. You would then Clear Matches. Once the total entered matches the total deposits on the bank statement, you are ready to take cancel. All deposits should be properly cleared at that point.
Clear By Date Range
![]()
![]() Clic
Clic
Click
on the deposit to clear. Click again to unclear. You can display the deposits
cleared or un-cleared by use of the Display Cleared and Display Un-cleared buttons.
The total cleared on the screen should match your bank statement when complete.
Calculate Bank Totals
Print Reconciliation Listings
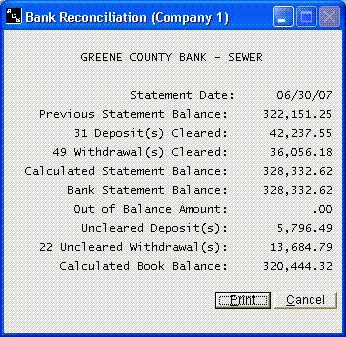
Please
note that any transactions dated after the cutoff date will not be listed as outstanding
on these reports.
Make Corrections
Or check out our special User's Only site at: planetacs.net/user