Print Checks
Help Home | System Home | Core | Errors |
You will use the Print Checks option found on the Checkbook System Menu to print checks. The standard system comes written for a three part check. Nebs laser check number 9039 will fit without any modifications. You can use any three part check you choose, but the date and amount normally have to moved around by ACS before it fits perfect.
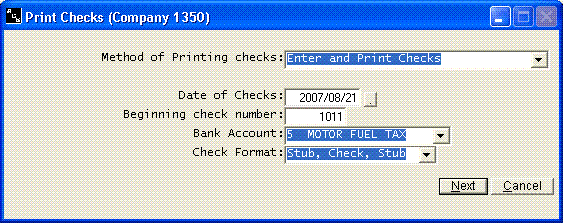
Any time you select to print checks, you will be asked the following questions.
You have the option to Enter and Print Checks without using the unpaid file or you can print checks for selected unpaid invoices. Most often you will use both options at various times. You can enter the invoices into the unpaid files all month long as the invoices come in. Then at some point in time you will select to pay these bills. In this case you would mark the invoices to be paid in the Unpaid Invoice File. You would then take the Print Checks for Selected Invoice option at the top of this screen to print the checks. You will probably have occasions where you want the check printed immediately. You can choose the Enter and Print Check option to print checks for invoices that have not been recorded in the Unpaid Invoice File.
Note: Even if a screen displays the date in ccyymmdd format, you can enter the date in a simple mmddyy format and the system will turn the date around for you..
The last check number used by the system will always be stored and current check number will be displayed. Be sure to verify the check number.
The bank code will tell the system which bank account to use when printing the checks. If you have more than one bank account, you will need to pay attention to this code. The checks will be printed on the forms you have in the printer, but if you use a wrong code, the system will code the checks incorrectly and your bank balance will be wrong.
The following options are available when printing checks.
Enter and Print Checks
Enter and Print Checks will be used any time you wish to print a check without entering the invoice in the unpaid invoice file. Even if you are using the Accounts Payable features of this system, which require that you use the option to Print Checks for Selected Invoices to print the checks, you can still use Enter and Print Checks to print any check you need immediately.
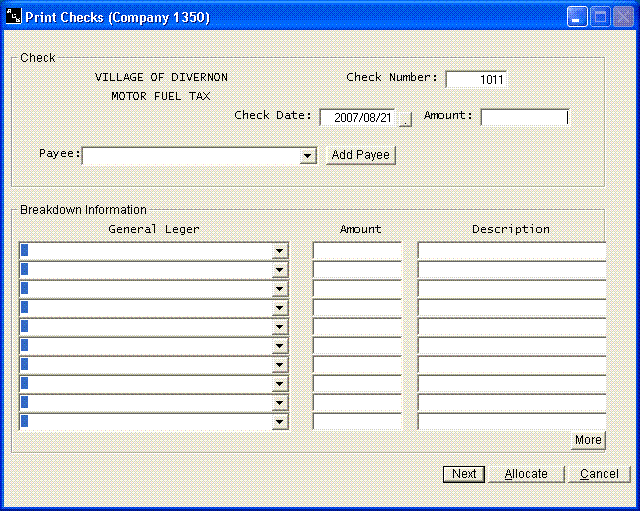
The first screen will ask the check information. The check number will be displayed. Make sure it agrees with your actual check. The current date will always be displayed. The only information you actually need is the total check amount and the payee information and the general ledger information.. The payee number is not mandatory, but if you have a payee record in your payee file, the system will display the payee name, description, and the general ledger breakdown information simply by clicking the Allocate button. You can then press Enter and the check will be printed. If you will use the ALT A to activate the Allocate button, you can print the check without ever touching the mouse. If you do not have a payee record for this vendor, you must enter the payee name, etc.
To add a payee while entering the check, click the Add Payee button.
Print Checks for Selected Invoices
The Print Checks for Selected Invoices option will be used to print checks for any invoices that have been entered and selected for payment. These invoices must have been previously entered using Unpaid Invoices option from the Checkbook System Menu. These invoices must also have been previously selected for payment.
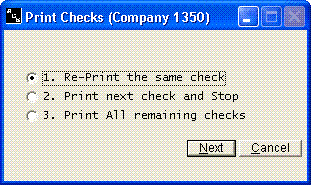
Once all checks have been printed, you will receive a screen similar to the following:
As the final step, you must transfer the checks you have printed to your transaction history file. If you are just testing the system, or if you have printed some checks by mistake, you have no choice but to transfer the checks to your history file. If you need to remove the checks from the history file, you must access your Transaction history file from the Checkbook menu and either void or delete the checks.
You have an option to reprint any checks on the same screen that asks if you are ready to transfer to history. If the paper has jammed, etc. and you do need to reprint some checks, be sure to take the reprint option at this time. The invoices are cleared from the unpaid file as the checks are transferred and it will be to late to reprint any checks without having to reenter the invoices.
Print Payroll Checks
The Print Payroll Option has not been completed at the time this manual is being prepared. Once completed, this option will allow you to print payroll checks. This is simply a check print feature. The system will not calculate any deductions. You must calculate all Federal, FICA, and State withholdings. The system will then print the check and transfer the payroll information to your transaction history file. The payroll information can then be transferred to your accountant at month end. Your accountant can then prepare your payroll reports and W-2s from this information. If you wish for the system to calculate your payroll, you must acquire the complete payroll system, which is a separate application.
You must set up a payee record for each employee before you can utilize this payroll check feature. Please note that payroll checks are printed as they are entered. They are not entered in the Unpaid Invoice file. You simply take this check print option and begin entering the payroll information. The screen will look similar to the following:
The check number and date will be displayed. You should enter the net check amount (amount of the check after the deductions are taken out) in the net amount field. You must have the employee record set up in your payee file. Once you enter the payee number, the employee's name will be pulled from the payee file and displayed on the screen.
The system will force you to enter your payroll information correctly. If the check does not foot, you will be forced to either correct the net check or correct the deductions.
Or check out our special User's Only site at: planetacs.net/user


