Transaction
Help Home | System Home | Core | Errors |
Every check, receipt, or miscellaneous transaction is stored in your checkbook transaction file. All print programs in the system, except the unpaid invoice listing, extract their information from this file. These transactions will be retained in this file until they are dumped using the remove transactions option from the Checkbook System Menu. Each check is placed in this file immediately after printing.
You will record receipts and hand written checks directly into the transaction file.
You can make corrections to your checkbook history anytime. If the transaction has been previously posted to the General Ledger, you will be given a warning that you will need to make an adjustment to the General Ledger.
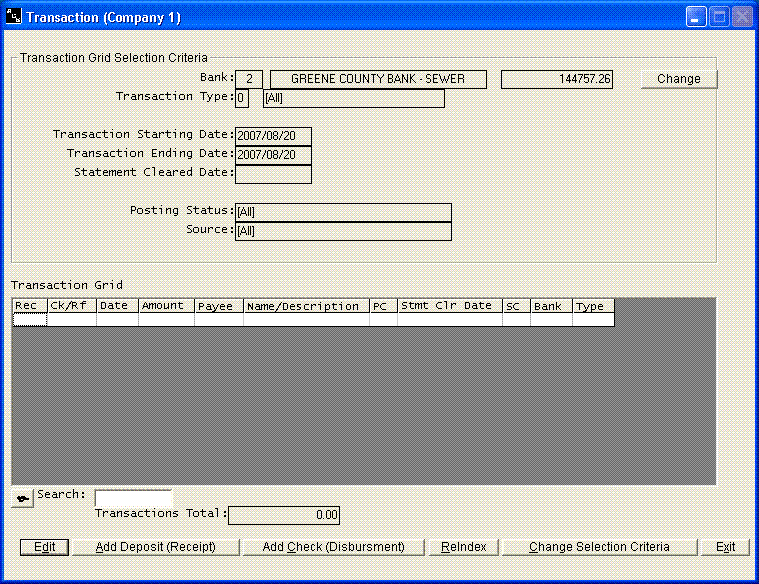
You can access this checkbook transaction file at any time. You can use this option to void checks or correct transactions. You can also use the option to review any transactions. Any corrections you make to this file will affect the bank balance, as well as all reports. As you access this file, you must first indicate the bank account in which you will be working. You must then indicate the type of transaction you will be accessing. If you wish to work from a different bank account or work with a different type of transaction, you must return to this sub-menu.

You should first select the bank account and the type of transaction., The date ranges allow you to limit the transactions that will be shown to a certain date range. The default is all of this month and all of last month. You may choose to look at any date range you choose.. You also have options to limit the list of transactions to those that cleared on a certain date or to a specific transaction. To add new transactions, you must proceed to the next screen.

Correct Transactions
You can review or change any transactions by clicking on the transaction in the display. If the transaction you are looking for is not in the display, you may have used a wrong date range on the previous screen or selected a wrong transaction type or used a wrong bank account. Please note that any change you make to a transaction will automatically adjust the bank balance.
Note the Search box at the bottom of the listing. You can use this box to search for any piece of information that is contained in the transaction, such as the check number, payee name, date, etc.
Add Deposits (Receipts)

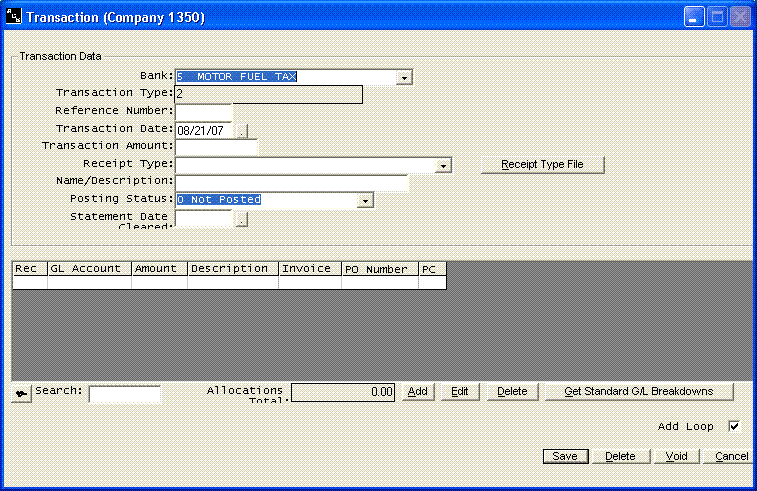
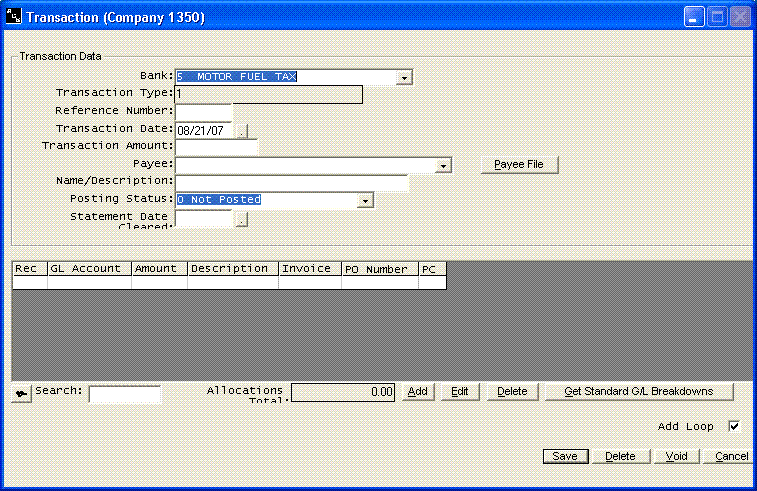
Note that you basically have two sets of buttons at the bottom of the screen. The set of buttons immediately below the general ledger breakdown information if used in adding and correcting the general ledger breakdown. The buttons along the bottom work with the entire screen.
Note the Add Loop button. When the box is checked, the system will loop on the same screen allowing you to enter additional transactions or entries without having to go back and forward between each entry. On the last entry, you will have to disable the add loop to get back a screen.
The Get Standard G/L Breakdown button is used to automatically pull the general ledger information once you select a receipt type. You do not have to enter a Receipt Type. Just skip over the field when enter transactions if it is not applicable to you.
The Delete button immediately under the breakdown screen will allow you to delete a general ledger breakdown. Simply highlight the specific breakdown and click the delete button. The Delete button at the bottom of the screen will delete the entire entry. If you wish to leave the entry in the files (to account for a voided receipt #, etc., you would normally use the Void option instead of the delete option. Both options adjust the bank balance for the deleted or voided entry..

Normally checks are recorded automatically to history as the checks are written, but you may have some small checking accounts that still have manually written checks. As always, be sure you are assigned to the correct bank account before you begin enter the checks. You have a payee file already being used by the system for printing checks. You can add vendors to this payee file to handle the manual checks in the same way. If you use the Payee option on manual checks, you can automatically pull up the description and general ledger breakdown information as the manual checks are being recorded. Once these vendors have been set up, simply select the vendor and click on the Get Standard Breakdown option at the bottom. Please note, if you don't like reaching for the mouse, you can use the alt keys to activate the buttons you wish to click. For example, on the Get Standard Breakdowns, the G is underlined. You can press the ALT key and the letter G at the same time and system will automatically execute the button. In this manner, you can enter an entire entry without the use of the mouse. You might also note that the button that is highlighted with the darker border is the default key when the Enter key is pressed. This normally allows you to press enter when you have finished a transaction, rather than reaching for the mouse.
Printing a Listing
Please note: You can print the information from any grid by clicking on the character to the left of the Search field. This will give you several options, one of which is to print. This can be very useful for simple listings, but for actual reports, use the menu to locate a report similar to what you need.
Or check out our special User's Only site at: planetacs.net/user