Enter Invoices
Help Home | System Home | Core | Errors |
The system will allow you to enter invoices as they are received and then choose to pay them a a later time. All of the unpaid invoices will be displayed when you first take this option.
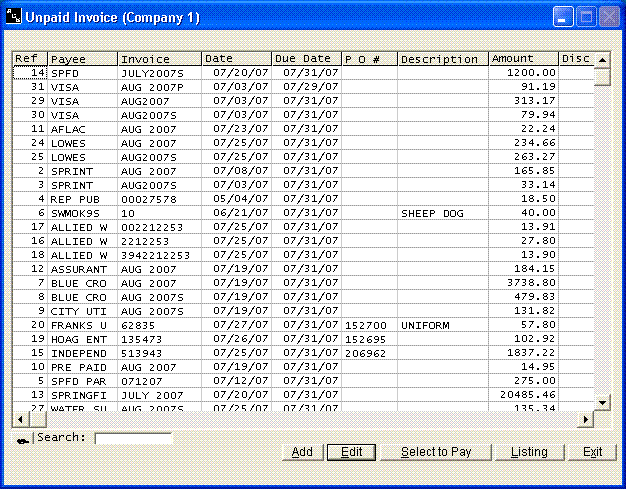
To add new invoices, click Add. To edit an existing invoice, highlight the invoice record and click edit or press Enter. You can also double click.
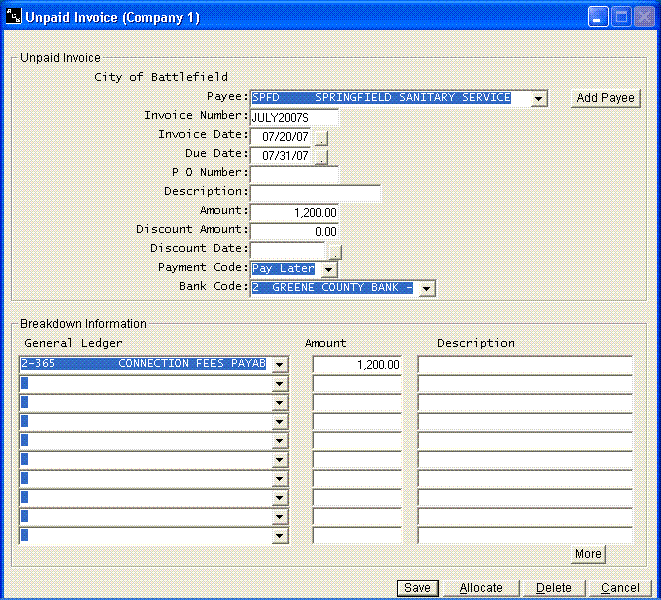
Payee Number
You will be selecting the payee number from a list of previously entered payees, but by clicking on Add Payee, you can enter new payees as you record invoices.
Invoice Number
You must enter a unique invoice number on every invoice. The invoice number is used by the system in identifying information in other files. If the invoice does not have an actual number, use a date or something that will be unique. You can use the same number on different vendors, just not the same vendor. One example of why invoice numbers must be unique is that the system will notify you if an invoice has already paid.
Invoice Date
The invoice date is mandatory. It will be shown on the various reports produced by the system and it will be used in determining your accounts payable balance at month end.
Due Date
The system will allow you to select your invoices for payment by the due date. If you are using the system as an accounts payable system and wish for the computer to locate and pay all invoices due by a certain date, you must enter the correct invoice due date. The due date also appears on the listing of unpaid invoices. If you use this listing to determine which invoices need to be paid, you may also need to enter the correct invoice due date. It is mandatory that a valid date be entered, but if you do not need the information mentioned above, you can simply skip the due date.
Purchase Order Number
The system allows you to enter the purchase order number, if one is applicable. The system does not need this information. The purchase order number will be shown on your unpaid invoice listing. If you use purchase orders, this will allow you to easily trace the invoice back to the purchase order. It will also help you to make sure that no invoices are being paid without a purchase order.
Invoice Description
The invoice description will be printed on various reports within the system, such as the Listing of Unpaid Invoices. It is not necessary to enter the description if you are coding your invoices for immediate payment. The description can be carried to the General Ledger system.
Amount
The amount field should contain the total amount of the invoice, or the amount you want paid. If you are entering credit memos, be sure to enter the amount as a negative figure.
Payment Code
The Payment Code is used to code the invoice for immediate payment. Choose Pay Now for immediate payment. If you are using the system as an accounts payable system, you can answer Pay Later and then code the invoice for payment at a later time..
Bank Code
If an invoice is coded for immediate payment, you must tell the system which bank account to use. The system will default to the bank account to which you are currently assigned.
General Ledger Number
You must enter a valid General Ledger Number. If the General Ledger Number is not in your chart of accounts, you must add the account before you can process this invoice. If this a constant problem or if you do not know the General Ledger Number, we recommend you set up an account called "unclassified" and use that General Ledger Number instead of guessing. This will force your accountant to reclassify these entries.
An invoice can be broken down to any number of General Ledger accounts. These numbers and the descriptions can be pulled from your payee files simply by clicking the Allocate button once the vendor number has been entered.. We recommend you place these General Ledger Numbers in any payee record that consistantly uses the same general ledger numbers. Refer to the Payee instructions for more details.
If you have more general breakdowns than will fit on one screen, click the More button and you can get additional screens.
Select To Pay
You can select the invoices to be paid by clicking on the Select Invoices button at the bottom of the first screen.
You have many options for selecting the invoices to be paid. Once invoices have been coded for payment, you should choose the Print Checks option from the main check book menu to print the checks. Once in the Check Print option,you should choose to Print from Selected Invoices on the first question.
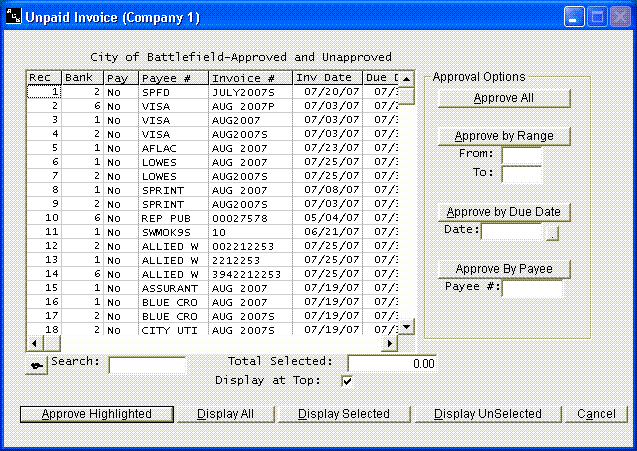
Select Specific Invoices to Pay
To select specific invoices to print, you can highlight any invoice and press Enter or click on the Approve Highlighted button at the bottom of the screen.
Approve All
If you choose Select All, all unpaid invoices in the file will be coded for payment.
Approve by Range
This option allows you to select a group of invoices by entering the first and last reference number of the invoices to be paid. The reference number that is being referred to is the numbers in the left hand most column.
Approve by Due Date
The date is based on the invoice due date. Enter the latest due date to be selected and then click on the Approve by Due Date button.
Approve by Vendor
You can select to pay all invoices on a certain vendor by entering the vendor number and then clicking on the Approve by Vendor button
Other Button Options
The Display Selected button and Display Un-selected buttons can be used to easily see what has been selected or not selected. The Display at Top button always positions the last invoice selected at the top of the screen. This makes it much easier to immediately see where on the list of invoices and find the next one to be printed.. The Listing button on the first screen will allow you to print a listing of all unpaid invoices. You can always print any of the listings you see on the screen by clicking on the character to the left of the search option. The is always a Print option available.
Once you are finished, take the Cancel button. If you are ready to print checks, take Print Checks option from the main Checkbook menu. Once there, take the selection to Print from Selected Invoices.
Or check out our special User's Only site at: planetacs.net/user