Create Hand Held File
Help Home | System Home | Core | Errors |
There are four major steps in entering readings using the Hand Held device. The first step is to transfer the customer records to your Hand Held unit. Select the Create Hand Held File from the Utility Billing Menu to do this transfer. The second step will be to actually enter the readings. This will be done directly on the Hand Held. The third step will be to transfer the readings back to the computer. The Retrieve Held Held File option will allow you to do this. The fourth (final) step will be to calculate the bills using the new readings. You will take the normal Enter Readings option from your Utility Billing Menu. You will then take the option Import from Hand Held. These four steps are explained in more detail below
Transfer Customers to Hand Held Device
The first step you must perform is to transfer the customers to the Hand Held device. You will perform this step each month at the time the meters are to be read. Be sure all new customers have been added to you Utility Billing system. Also be sure that the Water Code, Electric Code and Gas Code have been removed from any terminated customers, or place a Final Billing Code in the customer record. These customers will then be skipped as the meter reading file is being created.
Your meter reading file will be created in Route/Sequence sequence. Once you select the Create Hand Held File, you will receive the following options.
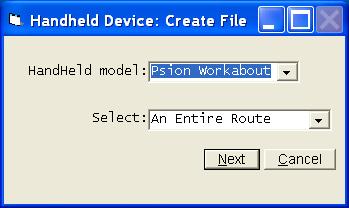
You have several options as to the way customers are selected. Some options include select all accounts, entire routes, a range of accounts, or specific customers.
Your Hand Held unit will have limitations on the number of customers it can hold at one time. You will most often select to read one route a a time. This limits the size of the file and also ensures that you never loose all of your readings.
You can place more than one route on the system, but be careful not to exceed the maximum number of customers that will fit on the hand held unit.
ACS sells the Psion hand held unit, but the Utility Billing system will interface with most hand held units. The number of customers each unit will hold varies by the brand and model you use.
Once you have selected the customers, you will take Finish and the customer records will be transferred to the hand held unit. Once the readings have been entered, you will transfer the readings back to the PC. You will use the Retrieve Hand Held File option on the Utility Billing Menu to move the readings back from the hand held to your PC. You must then select the Enter Readings option from the Utility Billing menu and choose the Import from Hand Held option to actually calculate the bills.
Specific Instructions for Psion Hand Held Unit
Following are specific instructions for using the Psior Workabout Hand Held Unit. If you use a hand held unit other than Psior, refer to your specific instructions.
·Step 1: Transfer the Customers to the Hand Held Unit
·Be Sure Workabout is connected to the PC.
·Be sure Link is active on Workabout.
·To Copy a file to the Workabout to be read select Preroute on Workabout
·To Copy new readings from Workabout to PC select Postroute on Workabout
·Enter EXIT on PC when completed.
To complete the transfer process on the Psion Workabout, take Preroute on the Hand Held. You can make your selection by using the arrow keys to find the option you want and then press Enter. The process will only take a few minutes. When the transfer is complete, type EXIT and press Enter on the PC to break the connection. You can then disconnect the Hand Held.
These instructions are written specifically for a Psion handheld meter reading device, but the procedures will be similar for any handheld you use. The way it is connected will differ, and the options you select on the handheld to start the transfer will differ, but all procedures and screens used within the Utility Billing system will be the same. The procedure for entering the reading will be completely different on each handheld. You must refer to the instructions provided with your handheld for entering the actual readings.
·Step 2: Enter Readings on the Hand Held Device
Once the route has been transferred, you are ready to begin entering readings. Turn the unit on. Take the Readings option from the first display and press Enter.
·When you select readings, you will be given the following options:
· __________________________________
· Enter Readings
· Locate Skipped Records
· Search
· Show Totals
· Complete
·_____________________________________
·The Readings option can be used at any time to enter readings. Use the Locate Skipped Records option to find any records that may have been skipped as the readings were entered. You can search for skipped records at any time.
The Search option will allow you to locate any customer record and then enter or change the readings. You can search on any information that is normally displayed on the screen, such as Customer Number, Customer Name, Service Address, Meter Number, etc. The search is case sensitive, so always be careful with upper and lower case letters. You do not have to enter the entire name, etc. on the searches, but the Hand Held will find the first customer record that matches the search criteria.
Show Totals will tell you how many customer records have been read and how many have been skipped.
Complete will return you to the first menu. The Esc key will also return you to a previous menu.
When you begin entering readings, the customer records will be displayed. Enter the current reading for each customer and press Enter. If the calculated usage is unusual or negative, you will immediately be given warnings. You must either accept the reading, change the reading or skip the customer. If a customer is skipped, you can enter the reading at a later time.
·You have the following options available as you enter readings:
·(B)ackBacks up one record
·(N)extAdvances to next record
·(F)irstMoves the first customer on the Hand Held
·(L)astMoves the last record on the Hand Held
·(U)pdateUpdates the footnote message
If you only have time to enter part of the route, you can stop at any point without destroying your files. You simply turn the Hand Held off and when you turn it back on you will automatically continue from where you left off. Once the route has been entered, your next step will be to transfer the readings back to the computer.
·Step 3: Transfer New Readings Back to Computer
·Your third step will be to transfer the new readings back to the computer. You will select Hand Held Device Menu from the Utility Billing Menu to start this process.
· Be Sure Workabout is connected to the PC.
·Be sure Link is active on Workabout.
·To Copy new readings from Workabout to PC select Postroute on Workabout
· Enter EXIT on PC when completed.
· Note: This process only transfers the readings back to the computer. This step does not actually calculate the bills. The readings are written to a temporary work file. You must select the Enter Readings option from the Utility Billing Menu on your PC and then select the option Import Hand Held File. You can then review the readings, calculate bills, or store the readings in holding files to be calculated later.
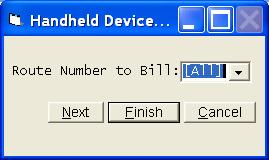
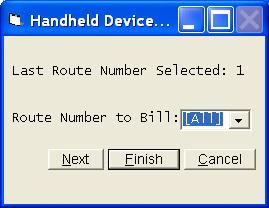
Also note, you will be asked the route number to use in storing the readings back on the computer. In theory, the readings from each route will remain on the PC for one month until you download new readings for the same route. At that time the old readings are removed and replaced by the new readings. If you are ever forced to split a route and enter the readings in two batches on the Hand Held, be very careful to use a different route number when storing the second half of the route back on the computer. The second batch of readings will cover up the first batch on the PC. To prevent this from happening, you could go to the Enter Readings option on your PC and store the first batch of readings in a holding file before the second batch is downloaded.
·Step 4: Calculate Bills
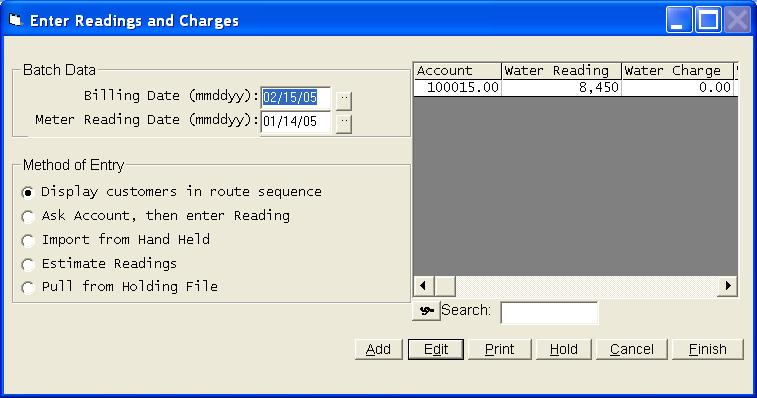
After each route is transferred back to the computer, you must take the Enter Readings option from the Utility Billing Menu to start the calculation process on each route.
 ·
·
Select the option Import from Hand Held. Once the readings have been pulled from the Hand Held files, you have the same options as if you had keyed the readings into the computer by hand. You can get edit lists and make any necessary corrections or add any readings that were skipped. We suggest you always get an edit list so you will have proof as to what readings were actually entered. You can either calculate the bills immediately or the readings can be stored. Once the calculation process has been selected, you can Print Bills, Billing Journal, etc. just as normal.
·Footnote
The Hand Held can display a footnote on any customer record. The meter reader can change any footnote and have it stored back on the PC for permanent use.
To create a footnote record for the Hand Held, access the customer record on the PC. Click on Remarks. The first character in the footnote record must be an astrik (*). Only the first 20 characters after the astrik will be taken to the Hand Held. You can only have one footnote. A second note will simply be ignored by the Hand Held.
The meter reader has an option on the Readings screen on the Hand Held to enter or change any footnote. As the new readings are being imported into the Utility Billing system, the new footnotes will be printed and also stored in the customer's footnote file. This new note will be sent to the Hand Held in the future.
·ACS Hand Held Meter Reading Software
The ACS Hand Held Meter Reading software works with Psion Workabout Hand Held unit. The system will allow you to key readings directly to the Hand Held unit and then download these readings back to the PC for calculations.
·Highlights
· Displays Customer Name, Meter Address, Account Number, Reading, Previous Usage and Footnote on Hand Held screen
·Can download complete or partial route to Hand Held immediately before reading (thus allows all customer information to be current)
·Allows user to skip back and forth, if necessary, as readings are being entered
Contains search options on Customer Name, Meter Address, and Account Number to allow user to find specific accounts
·Contains option to search for any skipped records
·Allows for up to three different meters (gas, water, and electric) to be read at same time
·Warns user of unusual usage or negative usage on readings
·Allows for meter rolls
·Allows user to enter Footnote information that will be displayed in the future
·Shows total meters read and skipped
·Easily attaches to PC docking station
·Allows readings to be stored in Holding Files and calculated at later date
·Allows operator to get listings and make changes before actual bills are calculated
Or check out our special User's Only site at: planetacs.net/user